For a quick start, these 2 requirements are all you need to know to get started. Keep reading below for more details.
There are only two requirements:
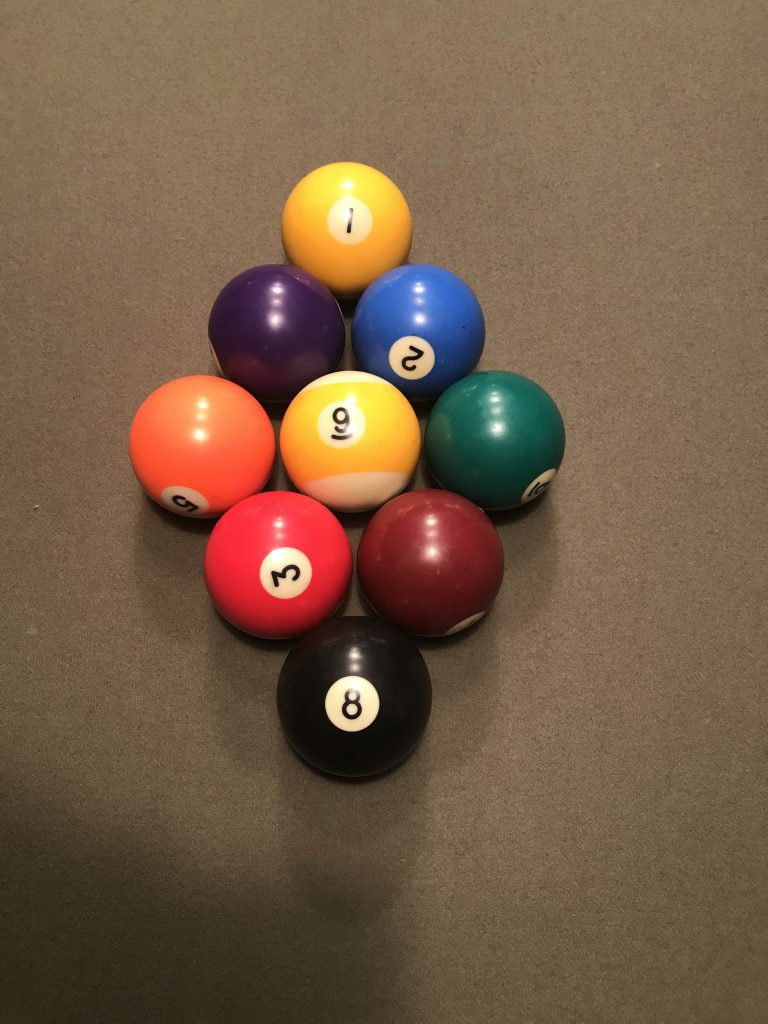
1 – The 1 ball must be at the top
2 – The 9 ball must be in the middle.
That’s it. All other balls can be randomly placed anywhere
Try to get the balls as tight as possible. In competitive play, most players will be sure all balls are touching before they break.
But if you’re just playing among friends for fun just do the best you can. Good Luck!
More details: Your Ultimate Guide for Racking 9-Ball like a pro
9-ball is a thrilling and fast-paced billiards game. A crucial element of any 9-ball match, whether casual or competitive, is the rack. A well-executed rack can set the tone for the entire game, offering opportunities for a quick win or setting the stage for a strategic battle. This comprehensive guide will delve into the intricacies of racking 9-ball, covering everything from the basic setup to advanced techniques and strategies. We’ll equip you with the knowledge and skills to rack like a seasoned pro, giving you a competitive edge every time you step up to the table.
Understanding the Importance of a Good Rack
Before we jump into the “how-to,” let’s emphasize why a good rack is so important. A tight, consistent rack is the foundation of a fair and exciting game. It ensures that the balls are positioned correctly, maximizing the chances of a legal break and minimizing the influence of luck. A poorly racked game, on the other hand, can lead to frustration, disputes, and an overall less enjoyable experience. Furthermore, in competitive settings, the rules regarding the rack are strictly enforced, and a legal rack is paramount.
The Essential Equipment for Racking 9-Ball
To rack 9-ball effectively, you’ll need the right tools. Fortunately, the equipment is relatively simple:
- Regulation 9-Ball Set: This includes nine object balls numbered 1 through 9, and a cue ball.
- Triangle Rack: A standard triangle rack is used to tightly pack the object balls. Make sure it’s in good condition, with no warped edges that could affect the rack’s tightness.
- Table Spot: While not strictly equipment, knowing the location of the head spot (the center of the head string) is essential for proper placement of the 1-ball.
Step-by-Step Guide to Racking 9-Ball
Now, let’s get into the nitty-gritty of racking. Follow these steps carefully for a perfect rack every time:
1. Placing the 1-Ball
The 1-ball must be placed on the head spot. This is a non-negotiable rule in 9-ball. Carefully position the 1-ball directly on the spot. This is your anchor, and everything else will be built around it.
2. Arranging the Remaining Balls
Next, you need to arrange the rest of the object balls within the triangle. There’s a specific order:
- The 9-ball goes in the center of the rack.
- The remaining balls can be placed randomly, except for the 1-ball (which is already on the head spot) and the 9-ball (which is in the center).
While the placement of the other balls might seem arbitrary, a good strategy is to try and avoid clustering the higher-numbered balls near the corners. This can sometimes lead to easier shots on those balls after the break.
3. Tightly Packing the Rack
This is arguably the most crucial step. You need to ensure that the balls are packed as tightly as possible. Here’s how:
- Start with the triangle flat on the table: Position the triangle so that the 1-ball is at the apex and the other balls are within the triangle.
- Push the balls together: Apply even pressure to all sides of the triangle, pushing the balls toward the apex (the 1-ball).
- Check for gaps: Carefully inspect the rack for any visible gaps between the balls. If you see any, readjust the balls and try again. A tight rack is essential for a good break.
4. Removing the Rack
Once you are satisfied with the tightness of the rack, carefully and vertically lift the triangle rack. Do this smoothly and steadily, ensuring that you don’t disturb the balls. A slight wiggle or jerky motion can loosen the rack and compromise the break.
5. Checking the Rack
Finally, before the break, it’s a good idea to give the rack one last visual inspection. Make sure all the balls are still tightly packed and that the 1-ball is precisely on the head spot. If anything looks amiss, you can request a re-rack before the break is taken.
If you need a good rack or balls check out these good folks: https://seyberts.com/
How to crush that break: https://billiardsguru.com/8-ball-break/
Advanced Racking Techniques and Strategies
Beyond the basic steps, there are a few advanced techniques and strategies that can help you rack even more effectively:
Applying Pressure
As mentioned earlier, applying even pressure to all sides of the triangle is vital. Some players even use a slight downward pressure while pushing the balls together to ensure maximum tightness. However, be careful not to apply so much force that you damage the cloth or the balls.
The “Tap” Method
Some players prefer to “tap” the balls into place using the triangle. They’ll position the triangle over the balls and then gently tap the sides of the triangle with their finger or a soft object. This can sometimes help to settle the balls and eliminate any small gaps.
The Importance of Consistency
The key to successful racking is consistency. Develop a routine and stick to it. The more consistent you are, the more predictable your racks will become, and the more confident you will be in your game.
Common Racking Mistakes to Avoid
Even experienced players can sometimes make mistakes when racking. Here are some common pitfalls to avoid:
- Loose Rack: This is the cardinal sin of racking. A loose rack can lead to unpredictable breaks and unfair gameplay.
- Incorrect 1-Ball Placement: Forgetting to place the 1-ball on the head spot is a foul and will result in a re-rack.
- Moving the Balls After Removing the Rack: Once the rack is removed, you cannot touch or adjust the balls in any way. Doing so will result in a foul.
- Rushing the Process: Racking should be done carefully and deliberately. Don’t rush it, as this can lead to mistakes.
Racking Etiquette
Finally, let’s touch upon racking etiquette. In casual games, it’s customary for players to take turns racking. In tournaments and more formal settings, the rules regarding racking are usually clearly defined. Always be respectful of your opponent and the rules of the game.
Conclusion: The Art of the Rack
Racking 9-ball might seem like a simple task, but it’s an art form in itself. Mastering the rack is an essential skill for any serious 9-ball player. By following the steps outlined in this guide, practicing regularly, and avoiding common mistakes, you can develop a consistent and effective racking technique. A well-executed rack not only enhances the fairness and enjoyment of the game but also gives you a subtle yet significant advantage. So, step up to the table, take your time, and rack ’em tight! With practice and patience, you’ll be racking like a pro in no time.
Discover more from Billiards and Pool
Subscribe to get the latest posts sent to your email.