For a quick start all you need is 1 and 2 directly below. (More details further down)
There are only two requirements for an 8 ball break:
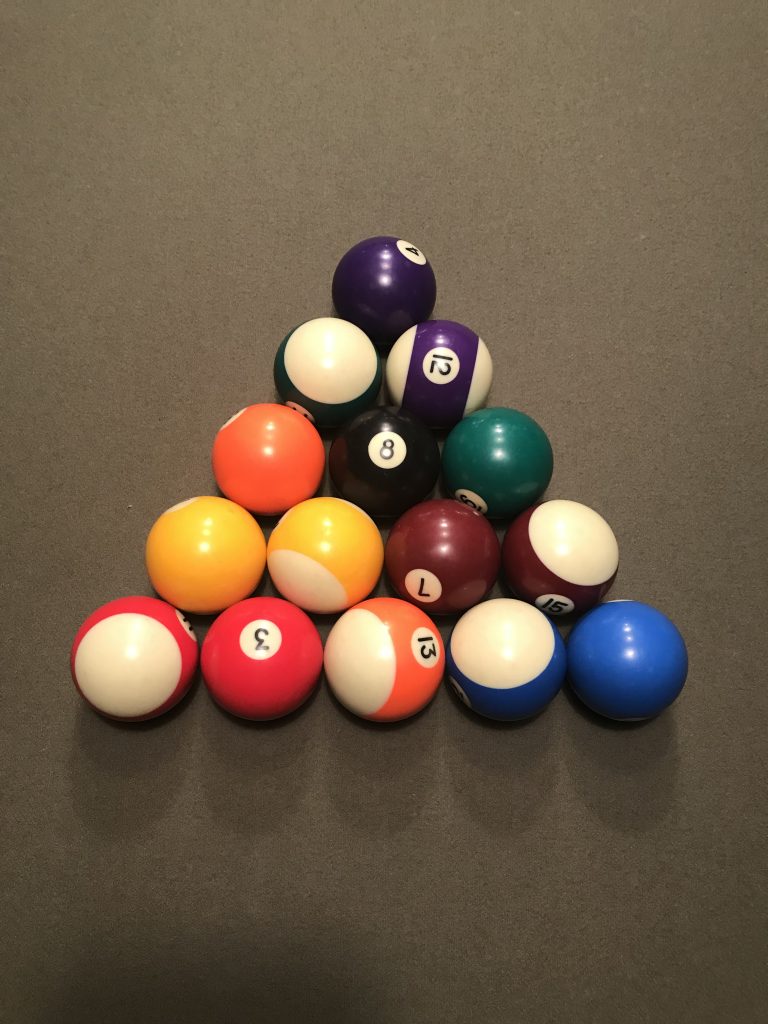
1 – You must place the 8 ball in the center position of the rack.
2 – On the two bottom corners of the rack, one must be a stripe and the other a solid. It doesn’t matter which corner gets what.
All the other balls can be placed in any position. Try to mix them up the best you can, but it is not required. Also, even though many people put the one ball at the top, this is also not a requirement in 8-ball.
More details: Your Ultimate Guide to Setting Up 8-Ball
8-ball, a classic pub game enjoyed worldwide, hinges on skill, strategy, and a little bit of luck. But before you can showcase your prowess, you need a perfectly racked set of balls. A sloppy rack can lead to unfair breaks and frustrating gameplay. This comprehensive guide dives deep into the art of racking for 8-ball, ensuring you start every game with a fair and exciting playing field.
Why a Proper Rack Matters
A well-racked game of 8-ball isn’t just about aesthetics; it’s fundamental to fair play. A tight rack ensures consistent breaks, prevents lucky shots from dominating the game, and promotes a balanced contest. Conversely, a loose or poorly arranged rack can favor one player over another, creating an uneven playing field and diminishing the enjoyment of the game. Think of it as the foundation upon which the entire match is built. Without a solid foundation, the game can crumble.
The Essential Elements of a Perfect 8-Ball Rack
Several key elements contribute to a perfect 8-ball rack. Mastering these will elevate your game and ensure fair play every time.
1. The Triangle Rack: Your Trusty Tool
The triangle rack is the standard tool for setting up 8-ball. It ensures a consistent and tight formation of the balls. Make sure you use a regulation-sized rack designed for standard billiard balls.
2. The Balls: Cleanliness is Key
Clean billiard balls are crucial for a good rack. Dirt and grime can prevent the balls from making solid contact, leading to poor breaks and frustrating gameplay. Regularly clean your balls with a specialized billiard ball cleaner and a soft cloth to maintain their smooth surface and ensure optimal performance.
3. The Cloth: A Smooth Surface for Success
The condition of the pool table cloth also plays a significant role in racking. A worn or torn cloth can interfere with the tight packing of the balls. Ensure your table cloth is in good condition, free of rips, tears, or excessive wear. A clean and well-maintained cloth contributes to a smooth and consistent rack.
4. The Magic of Tightness: All Balls Touching
This is the golden rule of racking: all the balls must be touching. No gaps, no exceptions. This creates the tightest possible formation, leading to a powerful and fair break. A loose rack is the bane of any serious 8-ball player.
If you need supplies this is a good website: https://seyberts.com/
Step-by-Step Guide to Racking Like a Pro
Now, let’s break down the racking process into easy-to-follow steps:
Step 1: Positioning the Rack
Place the triangle rack at the head of the table, with the apex ball (the front ball) positioned on the foot spot. The foot spot is the marked point on the table’s head rail, indicating the center of the racking area.
Step 2: Arranging the Balls
The 8-ball must be in the center of the fourth row of the rack. The two corner balls of the rack must be a stripe and a solid. Beyond that, the arrangement of the remaining balls is random. This randomization adds an element of chance to the game.
Step 3: Packing the Balls
Here’s the crucial part: ensuring all the balls are touching. Start by placing the balls gently within the rack. Then, use your hands to carefully push the balls together, ensuring they are tightly packed. You can also use a racking cloth or a billiard ball to gently tap the balls into a tighter formation.
Step 4: Checking for Tightness
Once you think the rack is tight, double-check. Run your fingers along the edges of the balls. You should feel no gaps. If you can see light between the balls, the rack isn’t tight enough. Continue adjusting until you achieve a perfectly tight formation.
Step 5: Removing the Rack
Once you’re satisfied with the tightness, carefully remove the triangle rack. Lift it straight up, ensuring you don’t disturb the perfectly arranged balls. A smooth and vertical removal is key to preserving the rack’s integrity.
Advanced Racking Techniques
For those seeking to perfect their racking skills, here are some advanced tips:
The “Tap and Tuck” Method
This technique involves gently tapping the balls with a spare ball or the side of your hand after they are in the rack. This helps settle the balls and eliminate any minor gaps that might not be visible to the naked eye.
The Cloth Trick
Some players use a racking cloth to ensure a super-tight rack. They place the cloth over the racked balls and then gently push down, creating a vacuum-like seal that further tightens the formation.
Practice Makes Perfect
Like any skill, racking takes practice. The more you do it, the better you’ll become at achieving a consistently tight and perfect rack. Don’t be afraid to experiment and find what works best for you.
Common Racking Mistakes to Avoid
Even experienced players sometimes make racking mistakes. Here are some common pitfalls to avoid:
Not Checking for Tightness
The biggest mistake is assuming the rack is tight without actually checking. Always double-check for gaps before removing the rack.
Rushing the Process
Racking shouldn’t be a rushed affair. Take your time and ensure every ball is properly positioned and tightly packed.
Disturbing the Rack While Removing It
Be careful when removing the rack. Lift it straight up to avoid disturbing the balls.
Using a Damaged Rack
A damaged or warped rack will never produce a good rack. Ensure your rack is in good condition.
The Importance of Communication
Finally, communication is key. Before the break, both players should agree that the rack is acceptable. If either player has concerns, the rack should be adjusted until both players are satisfied. This simple step can prevent disputes and ensure a fair and enjoyable game for everyone.
Conclusion: Mastering the Rack, Mastering the Game
Racking might seem like a simple task, but it’s a fundamental aspect of 8-ball. Mastering the art of racking ensures fair play, promotes consistent breaks, and sets the stage for an exciting and competitive game. By following the tips and techniques outlined in this guide, you’ll be well on your way to becoming a racking pro and elevating your 8-ball game to the next level. So, grab your triangle, clean your balls, and get ready to conquer the rack!
Discover more from Billiards and Pool
Subscribe to get the latest posts sent to your email.